The New Default. Your hub for building smart, fast, and sustainable AI software
Backend prototyping has a friction problem. You have an idea, you want to test it quickly, but before you can run a single API call you've spent hours on boilerplate: defining routes, configuring authentication, wiring up a database, handling error responses.
That setup work is necessary but not interesting – it doesn't validate your idea, it just precedes the validation.
LLMs change this.
By combining a well-structured OpenAPI v3 specification with a capable language model and an AI coding assistant like aider, you can go from a plain-English idea to a working backend prototype in a fraction of the time traditional setup requires.
This post walks through the process step by step, using a practical example throughout.
Executive Summary
Using LLMs to generate backend prototypes from OpenAPI v3 specifications is a four-step process: input your idea in plain English, let the LLM generate a complete OpenAPI v3 spec, use that spec to scaffold the backend implementation, and generate HTTP clients automatically from the same spec.
The key insight is that the OpenAPI spec acts as a structured intermediate layer – precise enough for code generation, but generated from natural language rather than written by hand.
The result is a working backend scaffold in hours rather than days, with security, error handling, and consistent data models built in from the start.
Why LLMs Change Backend Prototyping
Businesses are constantly pressured to bring products to market quickly, adapt to evolving user needs, and scale seamlessly. Traditional backend prototyping, while reliable, creates bottlenecks – particularly when interpreting and implementing complex API specifications manually.
LLMs address this in four specific ways.
First, they automate the repetitive coding tasks that slow early-stage development: setting up API routes, configuring databases, writing boilerplate code.
By generating backend code directly from structured inputs like OpenAPI v3 specifications, they let teams focus on business logic and architecture rather than routine setup.
Second, they improve consistency. Manually interpreting API specifications introduces mistakes – misconfigured data types, overlooked validation rules, inconsistent error handling.
Given a well-defined OpenAPI v3 document, an LLM produces consistent code that aligns closely with the original specifications, reducing the risk of bugs from the start.
Third, they handle change better than hand-written boilerplate. When API specs change, you can update the specification and prompt the model to regenerate or modify the affected parts, rather than tracking down every place a change needs to be reflected.
Fourth, they make complex architectures more approachable. LLMs can quickly scaffold multiple microservices, ensuring consistency across components and simplifying integration – allowing prototypes to evolve into production-ready systems with less rework than starting from scratch.
The Four-Step Workflow
The process connects four stages: idea input, OpenAPI spec generation, backend implementation, and HTTP client generation.
Each stage is distinct, which matters – separating the spec generation from the backend generation gives the LLM more focused context at each step and makes corrections easier to apply.
To make this concrete, the following steps use a running example: a link-keeping solution that allows users to add, annotate, and mark web links as read.
Step 1: Idea Input and Initialization
The process starts with a plain-English description of what you want to build. This serves as the foundation, guiding the LLM to understand the application's goals and requirements before any technical decisions are made.
For best results, the initial user prompt should be concise, focused, and as specific as possible about what the application needs to do.
The more clearly you can articulate the core functionality, the more accurately the LLM translates it into specification language.
Step 2: OpenAPI v3 Specification Generation
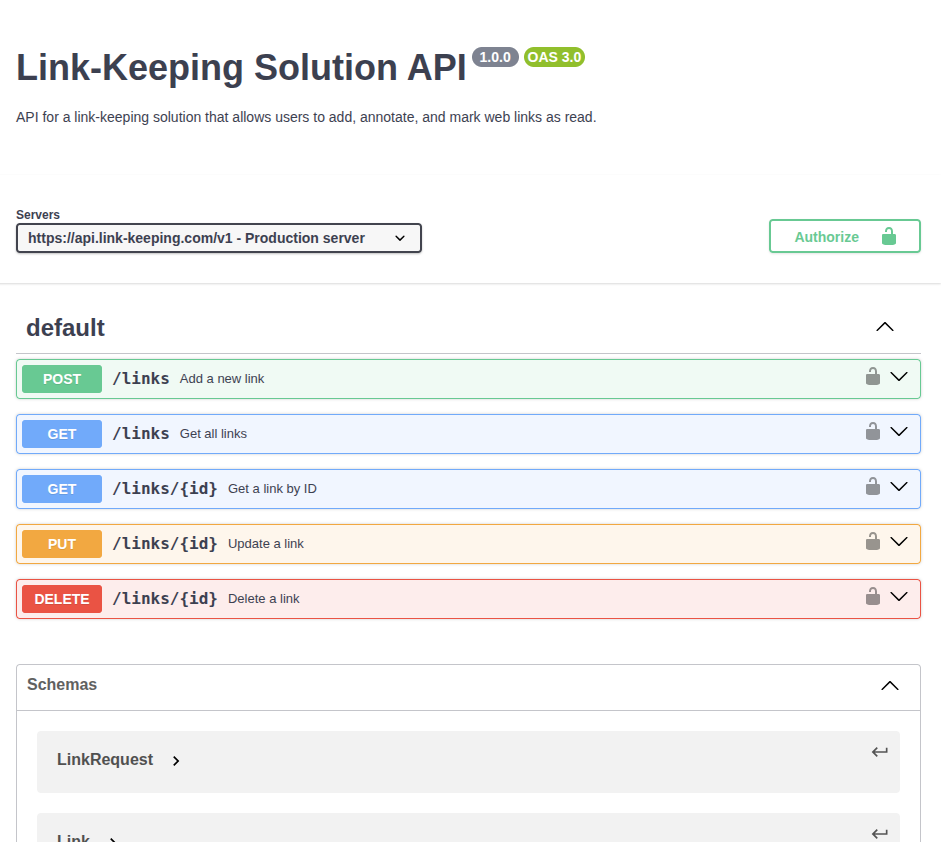
With the idea defined, the LLM generates an OpenAPI v3 specification outlining the CRUD operations needed to manipulate the application's data structures. The spec includes security definitions with scoped access, ensuring each endpoint is protected and accessible only to authorized users.
The system prompt for this step:
You are a software architect. The following messages will give you the user's idea of an application. Your task is to create an OpenAPI v3 (YAML) specification to satisfy the requirements provided in the user prompt and the <general_requirements> tag.
<general_requirements>
- Ensure the specification includes error responses, especially an invalid request case
- Ensure security annotations are placed in the spec. Each defined endpoint should have scoped access, specified in the JWT token. For example, creation must be possible only for users with the proper JWT scope.
- Keep data models as components whenever possible for easier reuse </general_requirements>
A few prompt design decisions worth explaining:
YAML is specified rather than JSON because it's less restrictive syntactically, making it easier to adjust specific parts without breaking the format.
Error responses are explicitly requested because they're optional in the OpenAPI specification but essential for production-quality code – without the prompt, the LLM often omits them.
Scoped security is requested with a concrete example because a basic prompt tends to produce only bearer token requirements without granular access control. Component schemas are required explicitly to keep the specification readable and maintainable.
The output below was generated using aider with the Codestral 25.01 model:
openapi: 3.0.0
info:
  title: Link-Keeping Solution API
  description: API for a link-keeping solution that allows users to add, annotate,
    and mark web links as read.
  version: 1.0.0
servers:
  - url: https://api.link-keeping.com/v1
    description: Production server
paths:
  /links:
    post:
      summary: Add a new link
      security:
        - bearerAuth: ["write:links"]
      requestBody:
        required: true
        content:
          application/json:
            schema:
              $ref: '#/components/schemas/LinkRequest'
      responses:
        '201':
          description: Link created successfully
          content:
            application/json:
              schema:
                $ref: '#/components/schemas/Link'
        '400':
          description: Invalid request
          content:
            application/json:
              schema:
                $ref: '#/components/schemas/Error'
        '401':
          description: Unauthorized
          content:
            application/json:
              schema:
                $ref: '#/components/schemas/Error'
        '403':
          description: Forbidden
          content:
            application/json:
              schema:
                $ref: '#/components/schemas/Error'
    get:
      summary: Get all links
      security:
        - bearerAuth: ["read:links"]
      responses:
        '200':
          description: A list of links
          content:
            application/json:
              schema:
                type: array
                items:
                  $ref: '#/components/schemas/Link'
        '401':
          description: Unauthorized
          content:
            application/json:
              schema:
                $ref: '#/components/schemas/Error'
        '403':
          description: Forbidden
          content:
            application/json:
              schema:
                $ref: '#/components/schemas/Error'
  /links/{id}:
    parameters:
      - name: id
        in: path
        required: true
        schema:
          type: string
        description: The ID of the link
    get:
      summary: Get a link by ID
      security:
        - bearerAuth: ["read:links"]
      responses:
        '200':
          description: A link object
          content:
            application/json:
              schema:
                $ref: '#/components/schemas/Link'
        '401':
          description: Unauthorized
          content:
            application/json:
              schema:
                $ref: '#/components/schemas/Error'
        '403':
          description: Forbidden
          content:
            application/json:
              schema:
                $ref: '#/components/schemas/Error'
        '404':
          description: Link not found
          content:
            application/json:
              schema:
                $ref: '#/components/schemas/Error'
    put:
      summary: Update a link
      security:
        - bearerAuth: ["write:links"]
      requestBody:
        required: true
        content:
          application/json:
            schema:
              $ref: '#/components/schemas/LinkRequest'
      responses:
        '200':
          description: Link updated successfully
          content:
            application/json:
              schema:
                $ref: '#/components/schemas/Link'
        '400':
          description: Invalid request
          content:
            application/json:
              schema:
                $ref: '#/components/schemas/Error'
        '401':
          description: Unauthorized
          content:
            application/json:
              schema:
                $ref: '#/components/schemas/Error'
        '403':
          description: Forbidden
          content:
            application/json:
              schema:
                $ref: '#/components/schemas/Error'
        '404':
          description: Link not found
          content:
            application/json:
              schema:
                $ref: '#/components/schemas/Error'
    delete:
      summary: Delete a link
      security:
        - bearerAuth: ["delete:links"]
      responses:
        '204':
          description: Link deleted successfully
        '401':
          description: Unauthorized
          content:
            application/json:
              schema:
                $ref: '#/components/schemas/Error'
        '403':
          description: Forbidden
          content:
            application/json:
              schema:
                $ref: '#/components/schemas/Error'
        '404':
          description: Link not found
          content:
            application/json:
              schema:
                $ref: '#/components/schemas/Error'
components:
  securitySchemes:
    bearerAuth:
      type: http
      scheme: bearer
      bearerFormat: JWT
  schemas:
    LinkRequest:
      type: object
      properties:
        url:
          type: string
          format: uri
          example: https://example.com
        title:
          type: string
          example: Example Website
        description:
          type: string
          example: This is an example website.
      required:
        - url
    Link:
      type: object
      properties:
        id:
          type: string
          example: "12345"
        url:
          type: string
          format: uri
          example: https://example.com
        title:
          type: string
          example: Example Website
        description:
          type: string
          example: This is an example website.
        read:
          type: boolean
          example: false
        annotations:
          type: array
          items:
            type: string
          example: []
    Error:
      type: object
      properties:
        message:
          type: string
          example: An error occurred
The resulting specification can be validated with https://editor.swagger.io/.
Step 3: Backend Prototype Development
With the OpenAPI spec defined in a separate file, the backend generation becomes its own focused process. Keeping these as separate steps gives more context space for adjustments and corrections of the generated backend code.
Since this prototype is a starting point for real development, the technology choices matter – you need to be able to continue working in the generated codebase comfortably.
In this example, Node.js is the runtime and SQLite the database.
The LLM can choose the HTTP framework, input validation solution, authentication validator, SQLite driver, and other dependencies, though you can narrow these choices further if you have preferences.
Assuming the spec file is named openapi.yaml, the prompt is:
Given the contents of openapi.yaml, create a backend implementation in Node.js,
using SQLite to store and retrieve user data.
Aider manages adding the openapi.yaml to the context automatically and converts the LLM output into a valid file structure on disk. The generated project structure:
├─ src/
│ ├─ controllers/
│ │ ├─ linkController.js
│ │ ├─ userController.js
│ │
│ ├─ routes/
│ │ ├─ linkRoutes.js
│ │ ├─ userRoutes.js
│ │
│ ├─ services/
│ │ ├─ authService.js
│ │
│ ├─ utils/
│ │ ├─ db.js
│ │
│ ├─ app.js
│
├─ .env
├─ package.json
The LLM produced a reasonable project structure and, without being asked directly, created register/login endpoints with password hashing logic – correctly reasoning that the application needs authentication to function.
It followed development and security best practices: the JWT secret is configurable via the .env file, route/controller/service definitions are properly separated, and the database structure is set up before use.
This saved hours of developer work, though it did need some manual corrections before the project would start cleanly.
Step 4: HTTP Client Generation
With a validated OpenAPI spec, HTTP client generation is straightforward. Using existing generators against the specification file from Step 2, you can generate 100% correct HTTP clients without any additional LLM involvement.
This approach is more reliable than AI-assisted client generation that targets implementation files directly, since the spec is machine-readable and the generator output is deterministic.
The Integrated Prototype Solution
The result is a working backend scaffold that meets the application's initial requirements: routes implemented, authentication wired, data models consistent across backend and client, and error handling present from the start.
The OpenAPI v3 specification is the key to what makes this approach work. By generating the spec first – in a structured, machine-readable format – rather than generating code directly from a prose description, the process becomes more predictable and the output more reliable.
The spec acts as a contract that both the backend implementation and the HTTP client generation derive from, ensuring consistency across the system without requiring the developer to manually maintain that consistency.
This prototype is a foundation, not a finished product. Developers iterate from here, building business logic on top of the scaffold rather than building the scaffold itself.
Why Your Team Should Adopt This Approach
The technical workflow above is primarily interesting to individual developers. The organizational case is different: this approach changes what a small team can prototype in a sprint, and that change has compounding effects.
Speed to first working endpoint. The traditional path from idea to testable backend – spec design, route setup, auth configuration, database wiring – typically takes several days even for experienced developers. The LLM-assisted path compresses this to hours. That matters most in two situations: early-stage validation (when you want to test whether an API design makes sense before committing to it) and rapid response to changing requirements (when a product decision requires a new set of endpoints and you want to evaluate the approach before writing production code).
Quality built in from the start. Because the generated code derives from an explicit OpenAPI spec with security scopes and error responses defined upfront, the prototype starts with better defaults than most hand-written boilerplate. Authentication, error handling, and consistent data models are present from the first commit rather than added incrementally. Teams that prototype this way tend to carry fewer of these gaps into production.
Reduced dependency on scarce specialist time. The more senior the developer, the more expensive it is to have them writing boilerplate. This approach shifts routine scaffold generation to the LLM, freeing senior engineers to focus on the decisions that actually require their expertise: architecture, data modeling, business logic.
A reusable contract across the team. The OpenAPI spec generated in Step 2 becomes a shared artifact – used by frontend developers to understand available endpoints, by QA engineers to write tests, and by product managers to validate that the implementation matches the requirements. This documentation value exists independently of the code generation use case.
At Monterail, this kind of AI-assisted backend scaffolding has become part of how we approach early-stage product work.
The Flink backend – a production-ready Go microservices architecture that scaled from 2 to 11 engineers while the platform grew to serve 10 million customers across 60 cities in 4 countries – illustrates what well-defined service boundaries enable at scale.
The principle is the same: clear contracts between services established early make scaling the team significantly easier later, because each component's interface is explicit rather than discovered through the codebase.
If your team is evaluating where AI-assisted development can save the most time, backend prototyping is one of the highest-leverage starting points.
Monterail's AI development services team works through these integration questions with product teams across industries.
Get in touch if you're working out how to introduce this into your workflow.
Key Takeaways
The spec-first approach – generating an OpenAPI v3 specification before generating backend code – yields more reliable results than directly generating code from prose descriptions. The spec acts as a structured intermediate layer that both guides code generation and serves as documentation.
Prompt design matters more than tool choice. The rationales behind the system prompt in Step 2 – requiring YAML, error responses, scoped security, and component schemas – directly determine the quality of the generated spec and everything that follows from it.
Separating spec generation from backend implementation (Steps 2 and 3) is not just organizational hygiene. It gives the LLM a more focused context at each step, making corrections easier to apply and output more consistent.
HTTP client generation from a validated spec (Step 4) is more reliable than AI-generated client code that targets implementation files directly. The openapi-generator output is deterministic; LLM client generation is not.
The organizational case for this approach is speed and quality: hours to a working prototype rather than days, with security and error handling present from the first commit rather than added as afterthoughts.
FAQ

Marcin Wróblewski
Senior Mobile Developer
Open-source enthusiast, focusing on Dart and Flutter due to their technical excellence. Codeusse’s creator.