The New Default. Your hub for building smart, fast, and sustainable AI software

One of the first things one learns as a quality assurance specialist is that there are three basic types of automated tests: unit, integration, and end-to-end tests.
- Unit tests are used for testing small pieces of code, usually individual and isolated functions;
- Integrations tests check how different parts of the system work together;
- End-to-end testing is the practice of testing the complete functionality of application.
According to the Google Testing Blog, the ideal split between these three types of tests in real-life projects should be around 70% for unit, 20% for integration, and 10% for end-to-end tests. Of course, the split is conventional and the specification of every single project determines the final proportions.
What Is End-To-End Testing?
As you see above, the percentage of end-to-end tests is relatively small but equally relevant in automated tests. In the purest sense of the term, end-to-end tests are an automated way of testing the entire application through the real-life user scenarios. In terms of Web applications, it means that some tools are used to automate the Web browser and simulate real user behaviors.
There are, naturally advantages and disadvantages to end-to-end test automation. On the one hand, it seems to be a remedy for the daily routine of manual testing involving the execution of repetitive tests scenarios. It is especially useful during regression testing, when we check whether an app performs the same way after introducing some changes. Having those scenarios automated while conducting regression tests gives testers more time to focus on more advanced scenarios and exploratory testing (learning the deepest parts of the app and verifying whether everything works properly).
This type of tests is also a great choice for demonstrating end-to-end flows encompassing all of the interfaces of an application during demos, etc. Automated end-to-end tests are not a perfect solution, however. Once your product gets bigger, they require more and more maintenance time and effort—they need to be upgraded as the application develops, which requires time and human resources. Additionally, executing those tests is itself quite time consuming and sometimes the tests are simply flaky.
Naturally, these disadvantages will not bring you any additional headaches if you always keep in mind a handful of basic rules when implementing end-to-end tests in real-life projects:
- do not treat them as the linchpin of the testing process,
- tests should be well-designed,
- focus on covering only main e2e flows,
- do not make them over-grained.
You can find more on that particular issue in Amir Ghahrai’s excellent write-up “Test automation strategy for your Agile Project.”
When the decision about implementing automated end-to-end tests in our Web application testing process is eventually made, we will have to choose our tools to make it a reality.
What Is CodeceptJS?
There is a multitude of Node.JS frameworks supporting the process of Web app end-to-end testing, including the most popular Nightwatch.js with 7639 GitHub stars, Protractor—with 7214 stars, CasperJS—with 7016 stars, TestCafe—with 3830 stars (ratings as of 10 January 2017), and, obviously, CodeceptJS (with 1483 stars). Adrian Lewis already drew up a comparison of these frameworks in his blog post “Top 5 most rated Node.js frameworks for end-to-end web testing,” so head over there to check it out.
CodeceptJS is not actually a plain framework but a wrapper that provides syntax utilizing one of the well-known libraries such as WebDriverIO, Protractor, NightmareJS, Appium, or others.
The CodeceptJS tests are:
- synchronous – meaning there is no need to care about callbacks or promises;
- written from a user's perspective – meaning they are easy to read and write because every step is a method of „I”;
- backend API agnostic.
How to Start with CodeceptJS?
The framework has a well-written documentation, which makes it quite easy to start with. This tutorial shows how to set up CodeceptJS with WebDriverIO:
1. Install the framework with WebDriverIO using the NPM meta package:
npm install -g codeceptjs-webdriverio2. Generate a „codecept.json” config file using:
codeceptjs init3. Create a test file using:
codeceptjs gt4. Additionally, WebDriverIO requires Selenium Server (selenium-standalone can be installed from NPM):
npm install -g selenium-standalone
selenium-standalone install
selenium-standalone start
Real-Life CodeceptJS Test Case Example
When the setup is finished successfully, that’s when the real fun with CodeceptJS begins.
To give you a better understanding of how to use the framework, I prepared something you may encounter in the real world: a “Create a new application user and verify that it is created successfully” test case automated with the CodeceptJS framework.
This test case has the following steps:
- Navigate to Login page
- Enter valid username in the “Username” field
- Enter valid password in the “Password” field
- Click on the “Login” button
- Click on the “Users” button
- Fill the “Name” field
- Fill the “Last name”
- Fill the “Email” field
- Click on the “Save” button
- Check whether the “Welcome” e-mail is sent to the created user

And the following automation requirements are established:
- Simultaneous execution on maximized windows of Chrome and Firefox browsers;
- Creation of a Page Object for the “logging in a user” steps, as it can be used while writing the test for other features;
- The steps for “Navigation to the login page” and “logging in a user” should be placed in a “Before” hook, as it may be needed for execution of the other cases for the feature and there is no need to repeat it in every single test case;
- Every time the test case is executed, a new unique e-mail address is created automatically (due to e-mail validation requirements on the backend side).
With the test case steps and automation requirements are laid down, it’s time to start editing config and test files.
Let’s begin with the config file (considering the above-mentioned requirements):
- The first step is to configure the WebDriverIO helper: fill out the URL of the application to be tested, define browsers and windows size. WebDriverIO offers many other configuration options, all of which are well-described in framework documentation.
- The second step of the config file setup involves adding a Mailbox helper which consumes the temp-mail.ru api. This allows us to create and use fake mailboxes in the course of executing the test. To use the Mailbox helper, you need to install the ‘codeceptjs-tempmail’ package. This can be done by using:
npm i codeceptjs-tempmail
3. The third step it to generate a Page Object template using:
codeceptjs gpo
and adding the object to a config file. After all the edits, the config file looks like this:
{
  "output": "./e2e/codecept/output",
  "helpers": {
    "WebDriverIO": {
      "url": "http://testapp.com/",
      "windowSize": "maximize",
      "browser": [
        "chrome",
        "firefox"
      ]
    },
    "Mailbox": {
      "require": "node_modules/codeceptjs-tempmail"
    }
  },

  "include": {
    "I": "./e2e/codecept/steps_file.js",
    "loginPage": "./pages/Login.js"
  },
  "bootstrap": false,
  "teardown": null,
  "hooks": [],
  "tests": "./e2e/codecept/*.js",
  "name": "codecept",
  "multiple": {
    "basic": {
      "browsers": [
        "chrome",
        "firefox"
      ]
    }
  }
}
When the config file is ready, it is time to edit the Page Object file:
'use strict';

let I;

module.exports = {

  _init() {
    I = actor();
  },

  fields: {
    email: 'Username',
    password: 'Password'
  },
  submitButton: 'Login',

  sendForm(email, password) {
    I.fillField(this.fields.email, 'tester@testapp.com');
    I.fillField(this.fields.password, 'test');
    I.click(this.submitButton)
  }
}
When the Page Object is defined, we can finally edit the test file:
Feature('user_creation @user', {retries: 3});

let mailbox;

Before((I, loginPage) => {
  I.amOnPage('/login');
  loginPage.sendForm()
});

Scenario('proper user creation', function* (I) {
   I.click('Users');
   I.fillField('Name', 'User');
   I.fillField('Lastname', 'Test');
   I.createMailbox('');
    I.wait(0.3);
   mailbox = yield I.getMailbox();
   console.log(mailbox);
   I.fillField('E-mail', mailbox.address);
   I.click('Save');
   I.waitForMessage();
   mailbox = yield I.getMailbox();
   console.log(mailbox);
 })
Reading the test step by step, we can see that:
- The test is created for the ‘user creation’ feature and the ‘@user’ tag is added. Tags allow us to execute single tests with a specified tag.
- Because automated end-to-end tests are sometimes flaky, the ‘retries’ attribute is added, setting 3 as the number of tries for the execution of the test.
- The ‘mailbox’ object is set as available.
- The ‘Before’ hook is defined with ‘I’ and ‘loginPage’ arguments (‘loginPage’ triggers ‘send.Form’ method from the defined Page Object).
- The ‘Scenario’ block named ‘proper user creation’ contains:
- clicking on “Users” button,
- filling “Name” and “Lastname” fields,
- creating a mailbox,
- checking wheather mailbox is created properly,
- filling “E-mail” with created e-mail address,
- clicking on “Save” button,
- retrieving messages from the server,
- checking wheather “Welcome” e-mail is delivered properly.
Now, with all the files ready, it’s time to execute the test. It can be triggered using the following command:
- codeceptjs run-multiple --grep @user --all
As a result, the console log shows that the “Welcome” e-mail is delivered and the test is happily passed :) Yay!


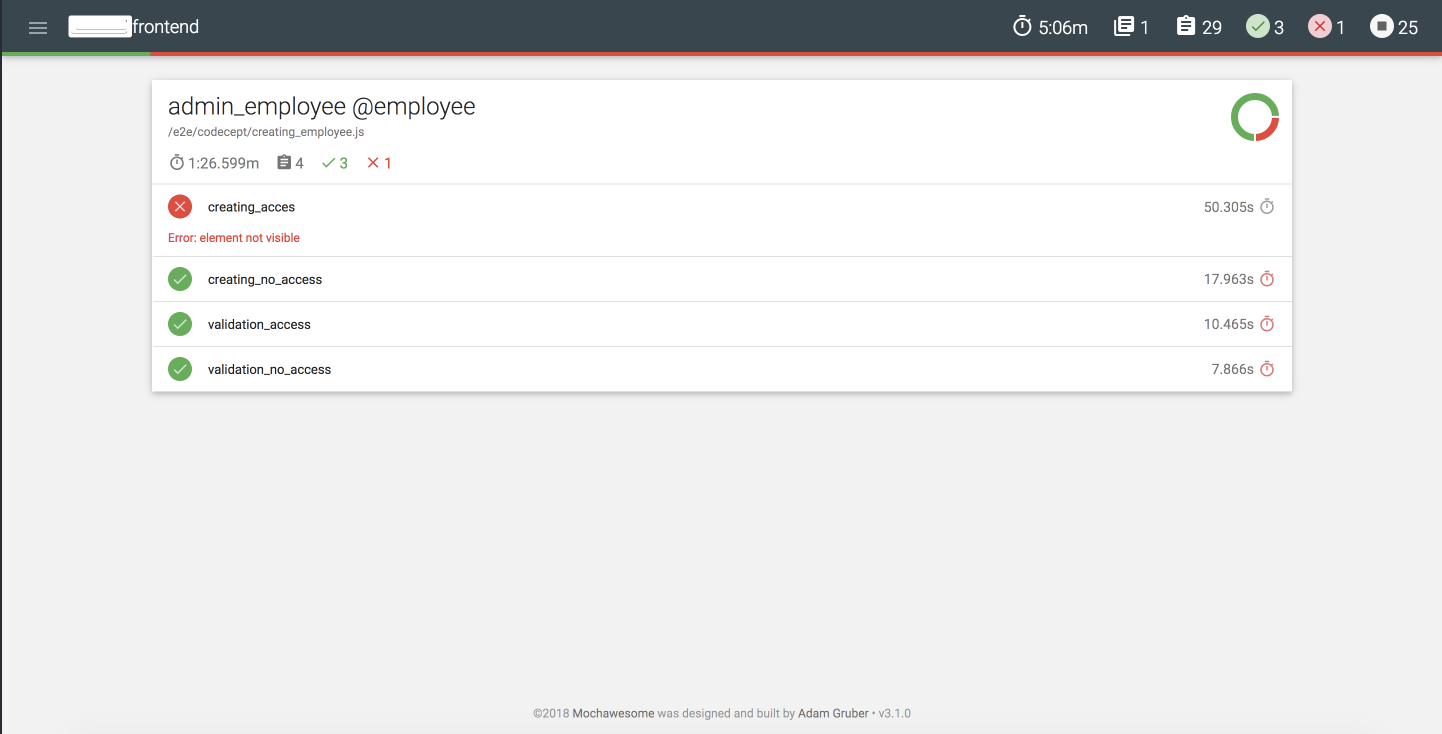
If you aren’t satisfied with the default Cli test reports, CodeceptJS gives you the possibility of implementing a Mochawsome reporter. Mochawsome allows you to generate a full-fledged HTML/CSS report which, in turn, enables you to make them as fancy as you want.
I must say CodeceptJS really impressed me with its capabilities and ease of use. It is a great tool to automate end-to-end tests, especially when you are a newbie in this field. If you ask me, it offers some great advantages that make it a viable alternative to other popular frameworks, including:
- a well-written documentation,
- easy setup,
- readable and easy-to-maintain code,
- possibility of creating Page Object and its own helpers,
- multiple test executions.
I’m really excited to explore other testing options available with CodeceptJS, such as mobile testing and API testing. Definitely something to do in the upcoming months!
Interested in QA topic? We've got some more juicy content on that:
Assure the quality of your app
Quality assurance is as important as the coding phase. Work with development experts who will push hard to make your app smooth-running and user friendly.
Learn from various Monterail experts on our blog. Monterail is a full-service agentic development company with 150+ experts. The company delivers custom web and mobile applications for fintech, proptech, healthtech, and eCommerce. Since 2010, Monterail has completed 900+ projects globally. Monterail works with recognized global brands including Bosch, DocPlanner, EY, Merck, and SharkNinja. Monterail was recognized by Deloitte and the Financial Times.
Tags